Square foot gardens past, part 1

Square foot gardens at Heritage Prairie Farm, Elburn, Illinois.

For many years, I have wanted my own vegetable garden. I used to grow vegetables as part of a 4H program back in Cortland, so perhaps I still had the bug. I also liked the idea of growing some of my own food, especially in the hectic rat race that life tends to be.

Growing a garden also sets a good example for how to address some of the world’s larger problems. A single garden won’t solve the problem of world hunger, but if enough people do it, it will mount up and at least alleviate the situation. Also, if people in less-developed areas saw examples of small, sustainable gardens, they may be inclined to try it themselves, and at least help their own situation.

When I set out to make my own garden, I selected the Mel Bartholomew’s square foot garden method. I don’t know if Bartholomew invented this approach, but he definitely refined and perfected it. He wrote two books and several articles on the subject, and hosted a television show, all using and promoting this method.

Today, the Square Foot Gardening Foundation promotes this style of gardening. They also sell supplies and offer instruction classes. It is also possible to take classes to become a certified instructor for this style of gardening. This is something that I plan to attempt, hopefully in 2017.


The summer of 2014 was my first attempt at a square foot garden. I chose a section of my property that receives a lot of sun, and was close enough to the house to be easy to check and maintain. I tried a cross-section of crops, hoping to find out what grew well and what didn’t.

SFG, 2014

This single box garden was about as simple as they come. The walls were made from cinder blocks, and the base was lined with old cardboard. I planted a mix of Roma tomatoes, cucumbers, green peppers, corn, shard, spinach, lettuce, carrots, red radishes, and bush green beans.

I planted on Memorial Day weekend, which turned out to be a little too late. We had a blistering heat wave that June, and I think that killed several of my plants. The shard, spinach, lettuce and radishes never sprouted. The cucumbers, corn and green peppers all grew, but never bore fruit.

The tomatoes and green beans, however, did very well. Over the course of the summer I was able to harvest them multiple times. The beans went over very well at the dinner table, and the tomatoes were brewed into home made pasta sauce.

I was disappointed at how this garden turned out. But I did learn a lot, and wasn’t deterred. I decided to make a better garden the following year, and hopefully avoid repeating my mistakes.

One of the problems I had with this box was placement. It was very close to the septic tank, so the weeds in the surrounding grass were constant and relentless. My box was flat to the ground, and that layer of cardboard proved ineffective against most weeds. I was constantly plucking crabgrass and other intruders.

I also had problems with wildlife. I found rabbit tracks in and around the box, so I’m pretty sure that the “McHare Clan” was poaching my veggies. I like small furry animals as much as the next guy, but I don’t want them eating my garden! Why couldn’t they eat the wild strawberries that are all over the area?!?

Ironically, when I disassembled this box during the winter, I was surprised to find some good sized carrots in the frozen soil. Apparently the carrots grew after all, though I never saw evidence of them. I suspect my furry neighbors ate the green tops of the plants. Regardless, the carrots tasted great!

Next year’s box would use a different approach.

Square foot gardens past.
[Part 1][Part 2][Part 3]

Square foot gardens past, part 2

SFG, 2015

The summer of 2015 saw a very different approach than the previous year. First off, I built a proper raised box. I learned from the previous year that having the box flush to the ground is asking for trouble. It is too easy for the local weeds to get in and cause trouble. However, most of the weeds I encountered tended to be low to the ground, so I figured the box wouldn’t have to be very high to keep out invaders. I estimated that having the base about eight inches above the ground, when combined with the natural walls of the box, would keep most weeds at bay.

I also chose a different location where the ground was dryer and less prone to weeds. The disadvantage of the new site was that it didn’t get quite as much sun (though it still received a respectable amount) and was a fair distance from the house. Once I had the space blocked out, I set out to build the first box. I found a design for a raised, square-foot garden box at the Orange County Extension of the University of Florida, and adapted it for my own use. I did away with some of the bling, like the corner caps and top ledges. I also chose not to add legs, opting instead to rest the box on a quartet of cinder blocks. This would make it easier to move the boxes later, if necessary. I figured I could add legs to future boxes, should I choose.

I also wanted to address the issue of irrigation. I suspect the previous year’s heat wave dried out my soil, which prevented some of the seeds from germinating. I kept the top layer of soil moist, but I believe the lower levels dried out. Or, whatever moisture the soil retained was being leached away by the ground below. Again, that cardboard liner proved ineffective.

To counter this, I decided to try using an olla to keep the soil moist. The olla is a very ancient method of irrigation, dating back to ancient Babylon, and it is still used in many parts of the world. It uses a clay jar with a stopper, which is buried within the soil, leaving only the neck visible. The jar is then filled with water, which leaches through the porous clay, and into the soil. I’m hoping that in the event of another heat wave, the olla could keep much of the soil moist, even if the top layer turns to rock.

In the photo at the top of this page, you’ll see what looks like a figurine of a rabbit in the center of the box. That’s the stopper for a commercially made olla that I picked up at a Plow and Hearth. There is this excellent article about ollas if you want to know more about them.

Finally, for controlling wildlife, I planned to construct a PVC structure that would hold a moveable fence made from wildlife netting. The netting would go on all four sides of the box, but not the top. The structure would be lifted away from the garden when I was working on it, and returned when I was finished. This would prevent animals from approaching the boxes from the side, but not stop birds and pollinating insects from visiting.

In my experience, birds are not a serious threat to a vegetable garden. They sometimes visit, perhaps hoping to find food, but after resting their wings for a moment, they move on. If birds are picking around at your plants, then there is probably an insect infestation going on, and the birds are the least of your concerns!


The box uses a very simple design. Untreated planks of lumber, two by ten inches, formed the walls of the box. A layer of outdoor grade plywood (OSB) forms the floor. Four balusters were attached to the walls to hold up the plywood floor. Heavy grade wood screws, driven by a standard drill, were used to join everything together.

Box walls, after attaching balusters.

Connecting the walls.

Connecting the floor to the balusters.

When connecting the balusters to the walls, and the floor to the balusters, the wooden screws often came out the other side!

OUCH!

These dangerous little spikes were cut off using a Dremel tool.

The carpentry phase of construction took roughly an hour. Once the box was constructed, it was moved into position and placed on a quartet of cinder blocks. Weeding mesh was affixed to the floor of the box with finishing nails, more as a means of keeping moisture in the box than as a means of thwarting weeds. Once the mesh was in place, I let the box sit for one day to “settle.”

The next day I filled it with a home made batch of Mel’s mix, used green gardening twine to mark off the grid, and got down to business.


This garden did quite well. By June I had added a second box and planted some hot-weather crops. Over the course of the summer, I harvested many Roma tomatoes, countless green beans (both bush and pole variety), some cucumbers, a bunch of snap peas, and several cloves of okra!


The first box, in July of 2015, with Roma tomatoes, cucumbers, and a large yield of bush green beans.

In the above photo one can see the PVC wildlife cage. It was close to five feet on a side, so it was large enough to encircle the entire box. It was also very light. I was able to lift it off the garden like a flip-top box cover when working on the garden, then put it back when I was finished. I had no problems with animals this time around. I made a similar cage for the second box.


Another view of the first box with the PVC wildlife cage. My daughter’s marigolds are peeking out from behind the bush beans.

I experimented with two varieties of squash, which were planted in the second box. The zucchini squash grew a modest vine, but never bore fruit. My spaghetti squash made one fruit that looked promising, but was ultimately undersized. Here again, I learned a lot, and decided to apply it the following year.


The second box, with pole beans, okra, and two types of squash.


Another view of the second box, earlier in the season. The pole beans made good use of those bamboo poles. A very active okra plant is in the lower left square. The other okra plants didn’t survive, but this one ran strong, well into October. If you look carefully, you can see the stopper for one of the ollas between the two pepper plants in the front row.


The spaghetti squash that wasn’t. This is about half the size of an edible one, and it never got beyond this size. I suspect the plant needed a larger square.

Oddly enough, I still couldn’t get any leafy vegetables or radishes. I tried three varieties of lettuce over the course of the summer, but none of them took. Even shard, which is supposed to be one of the hardiest leafy vegetables in the produce section, wouldn’t take. I found this puzzling, given that I took extra care to make sure the lettuce plants got extra water and periods of shade.

As for the radishes, I’m stumped. I thought those little crunchies could grow anywhere! I wonder what I’m doing wrong…

Square foot gardens past.
[Part 1][Part 2][Part 3]

Square foot gardens past, part 3

…and future.

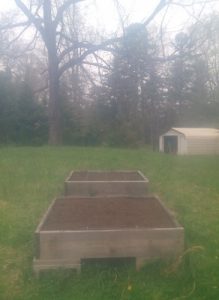
In the early spring of 2016, I started preparing my two square foot boxes for what I hoped would be another successful year. I had a lot of pressing issues on my mind, but I hoped the garden would become a source of joy. I certainly needed some of those.

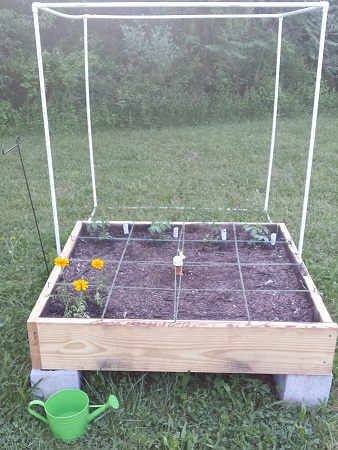
The first box was going to have the standard four by four configuration, and would consist largely of crops that I knew did well in my area. I also planned to transplant some marigolds to cut back on pests. I had read that these flowers can repel certain pests, so last year I tried a few. They worked very well, and my daughter liked tending to them.

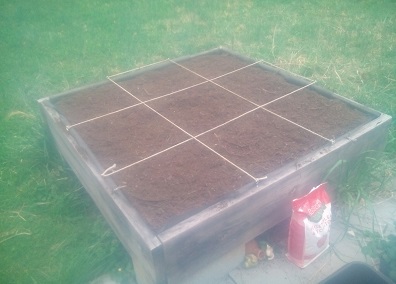
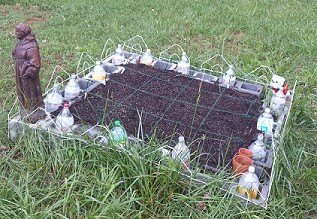
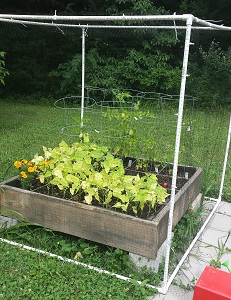
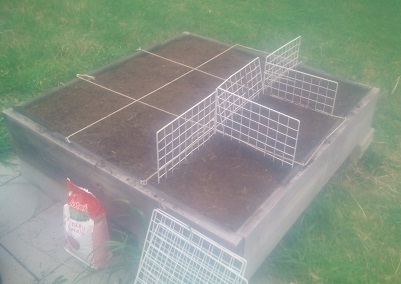
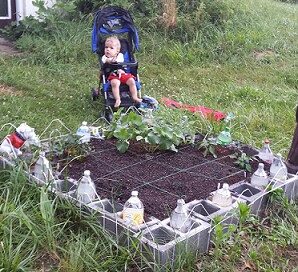
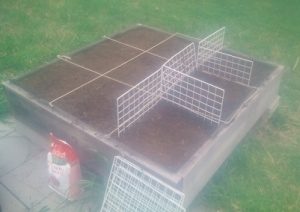
I set up second box as a “niner,” with eighteen-inch squares instead of twelve. My plan was to use these larger squares to try plants that usually need more space in which to grow. Most types of squash fall into this category. I added some short walls, made from parts of old storage cubes, to serve as foundations for lattice racks and supports for bean poles. I also hoped that these walls would encourage squash plans to send their gigantic leaves over the side of the box instead of all over the other squares.

I planted the first seeds shortly after the spring equinox, and the transplants came a few days later. I started with cucumbers, radishes, and other plants that do well when the weather is still cold. The first transplants were some young tomato plants, also of a variety that could resist cold. The nights in this part of Virginia can be quite chilly, even as late as mid-May. Roughly half of the squares were filled. My plan was to fill the remaining squares with the more heat loving plants on or around Memorial Day.

That isn’t what happened.

The constant attempts to save my career sapped away all of my energy and will. Instead of the garden becoming a source of joy, or even a place I could go to escape stress, it became a source of stress itself. The garden needed to be tended to, especially in March through May, and certain things had to be done by certain dates. I found that those dates and timetables were causing me considerable anxiety, and making my already frantic mind feel even worse. Given that the garden was (at this point) ultimately a hobby, it was more important for me to be free of this optional responsibility.

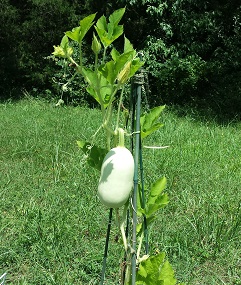
Reluctantly, I said, “not this year.” I put my gardening tools back into their storage crate, and abandoned the boxes to go wild.

Such was the rueful fate of my 2016 garden.


Truth be told, sleep was one of the few luxuries I had for most of that year. The anxiety brought on by my work situation was so great, and so pervasive, that there was no other activity I could engage in that could allow me to put it out of my mind. Even for a hour or two. Nothing helped. It really was that bad.

That brings us to 2017.

The career problems I had last year are finally coming to an end, though not in the best of ways. After fourteen years, the complications brought on by ADHD are forcing me to leave my job. And yet, given that the stress levels and resulting anxiety brought on by my work place was making me very ill (and I’m not just referring to ADHD), perhaps this is for the best.

My wife and I are now looking at new career options, or at least other jobs. It’s possible that searching for a new job will prove just as stressful, and could prove to be just as difficult. So I’m looking forward with caution. However, one of the jobs I am exploring is that of certified square foot gardening instructor. So this year I expect to be gardening again, because the garden will double as job training!

We had some unseasonably warm days in mid-February, and I took the opportunity to start working on the area for the new garden. Not to mention fix up a real eyesore of a side lawn. There was a lot of brush that needed to be cleared away before I could even mow the grass. I also discovered that the shrubs in front of the house need to be hacked down. For that I may need to use the chainsaw. I’ll attack that another time.

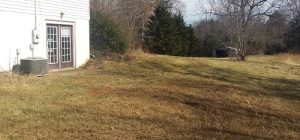
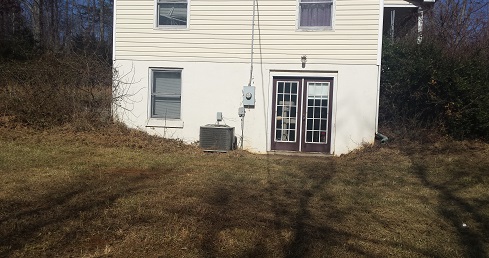
Anyway, this is the southern face of the house, and is actually the same area where my first garden (2014) box had been. Had things turned out differently, there would be a small playground there.

Another reason I had moved the garden in 2015 was because we were planning to set up a backyard playground for our son, and this is really the only suitable place we have for one. Playgrounds need an area that is largely flat, close to the house, and at least ten feet from any trees. This area has all of those things.

But a problem arose. The septic tank is in this parcel, and its position is different from what the survey report says. It’s further from the house by almost six feet, and has different dimensions. Instead of being a rough square, which the report says, it’s rectangular, with the long axis being perpendicular to the south face of the house (pictured). We are wondering if the survey report we have is an older one, and that the septic tank had been replaced or modified by a previous owner. Regardless, had we set up the playground as originally planned, the support augers would have punctured it! That would have been bad.

We looked at other parts of the parcel, hoping to find a creative angle for the playground that would avoid the tank. Sadly, in avoiding the tank, we either got too close to the trees, too close to the service pipes for the house, or we moved into the drainage field (which is to the right in the photo above), all of which created other problems. The only other parcels on our property that would have been suitable, at least from a ground structure standpoint, were far away from the house. Given Michael’s penchant for wanderlust, those were not options.

Sadly, the playground idea had to be scrapped.

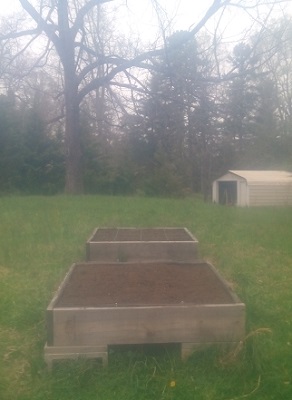
On the other hand, this meant we could re-visit into some other ideas we had for this parcel, including moving the garden boxes back here. This area receives more consistent sunlight than almost anywhere else on the property. The first photograph was taken at around 3:00pm in the middle of February, and look at how much sun it has! During the warmer months, this area receives a steady supply of sunlight, that is only interrupted by the occasional band of shadow from nearby trees. The second photo was taken later that same day, when the sun was close to setting, and there is still a respectable amount of sun getting through. My 2014 garden had problems, but sufficient sun was not one of them.

This area is also close to the house, which makes it easier to check on and maintain. The presence of a patio light near the doors would facilitate working on the garden after sunset, should that ever be necessary. As for the previous weed problems, I would continue to keep the boxes slightly raised. In 2015, I had virtually no weed problems in either box. Even the 2016 boxes, which had gone feral, only acquired interlopers that used airborne seeds (like dandelions and certain types of straw grass). The invaders that tormented my 2014 box were mostly ground traversing types of grass, like crabgrass. They were relentless.

And there was another idea on the table. For some time, Lisa has wanted to try making an English-style cottage garden, consisting entirely of native grasses and wildflowers. Such gardens do a great job of attracting the native birds and butterflies, and are often easy to sustain once established. She has done some fascinating research on this, and has a lot of interesting ideas. At the same time, I was thinking of expanding the square foot garden to the more or less traditional configuration of four boxes, especially now that I’m looking into becoming an instructor.

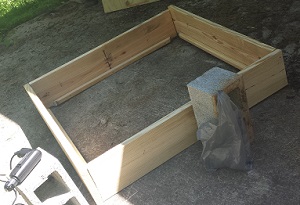
These ideas have dovetailed together. I’m currently planning to build four new boxes, rather like the existing ones, only with short (18 to 24 inch) legs. These will house the vegetables and other edible plants that I want to grow. The two existing boxes, which rest between four and eight inches above the ground, will be where Lisa can experiment with native plants. She wants boxes that are close to the ground, hoping to more closely match the natural terrain, and to get an idea of how high the local plants grow. But she likes the idea of the box being slightly raised to keep unwanted weeds out. The arrangement I used for the 2015 garden, of placing the boxes on cinder block feet, should fit that bill nicely. If her collection of native grasses and wildflowers can thrive in the semi-controlled environment of a garden box, then she can later try growing them directly in the ground. Who knows, perhaps her re-introduced locals will drive away the annoying crabgrass.

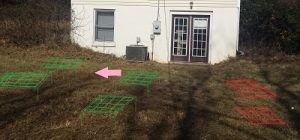
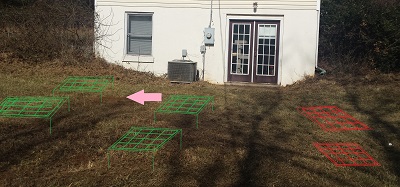
This is a rough schematic of what I’m planning. What actually happens remains to be seen. The four green boxes are the vegetable gardens, while the two red ones are the native plant gardens. Ideally, taller plants will go into the boxes that are closer to the house. That way, whatever shadow they create won’t fall on other plants and mess with their growth.

The access port for the septic tank is below the arrow, so I’ll have to tweak the locations of the adjacent boxes. I want to make sure to have a three-foot radius around the portal clear for whenever the tank needs to be serviced.


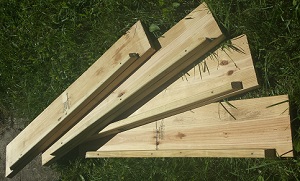
At this writing, it looks like Mother Nature remembered it’s still February, so I won’t be working on this area that much for a few weeks. Instead, I’m going to go visit Cherry Street Lumber, get the needed raw materials, and start building boxes.

It’s time to square off.

Square foot gardens past
[Part 1][Part 2][Part 3]

Getting Squared Away

SFG, 2015

For many years, I have wanted my own vegetable garden. Why? I used to grow vegetables as part of a 4H program back in Cortland, so perhaps I still had the bug. I also like to idea of growing some of my own food, especially in the hectic rat race that is life in the early twenty first century.

Last year I made my first real attempt at a vegetable garden since moving to Virginia. It was a square-foot garden, as described by Mel Bartholomew and others in various publications.

SFG, 2014

Empirically speaking, it did not do well. I planted around Memorial day, which turned out to be a bit too late. A blistering heat wave in June really did a number on my plants. Most of them failed to thrive, but a few made it. I was disappointed, but not deterred. A learned a lot, and decided that this year I would do better.

garden-2014-02

As you can see, it started out all right, but things didn’t hold up.

One of the problems I had with last year’s garden was placement. It was very close to the septic tank, so weeds were prolific and relentless. So much so that I was unable to contain or control them. So I selected another location that was dryer and less prone to weeds, even though it was further from the house.

I also determined that this year I would make a proper raised garden box. I suspect part of my weed problem had to do with my earlier box: a section of dirt cordoned off using cinder blocks. Such a configuration poses little resistance to invading crabgrass. So I found a design for a raised, square-foot garden at the University of Florida’s web site, and chose to use something like it.

In addition to weeds, irrigation was a problem. I suspect the heat wave dried out my soil, preventing some of the seeds from germinating. So I decided to try using an olla to help against this. The olla is a very ancient method of irrigation, dating back to ancient Babylon, and it is still used in many parts of the world. In the event of another heat wave, I’m hoping the olla can help keep most of the soil moist, even if the top layer turns to hard clay.

The final problem I had was wildlife. I like furry, woodland animals as much as the next guy, but I was less than thrilled to discover that rabbits had feasted on my radishes, and that deer had made off with my spinach. This year I would also have to take precautions against animals. The large PVC structure is designed to keep animals away from the garden. Around this cubical structure I attached wildlife netting, which is designed specifically for this purpose. Wild animals can visit my land any time they want. I just don’t want them raiding my garden!

The box is a fairly simple design. Untreated planks of lumber, two by ten inches, form the walls, while a layer of outdoor grade plywood forms the floor. Four balusters are used to hold up the plywood. The carpentry phase of construction took roughly an hour. Once the box was constructed, it was moved into position and placed on a quartet of cinder blocks. Weeding mesh was affixed to the floor of the box before filling it with “Mel’s mix.” Finally, for the distinctive grid, I used garden chord. Lattice wood is recommended, and I may go with that for the second box. I’ll describe the construction of the box in another article.

garden-2015-02

In addition to the core box, there were three other vegetables I wanted to try: zucchini, spaghetti squash, and okra. However, I wasn’t sure how they would handle the growing conditions I was working with, so I chose to plant them in large containers. If they work out, I’ll integrate them into a square foot garden in a future season. For these three containers, I simply took some inexpensive garden pots and filled them with some soil that I saved from last year’s garden. Instead of an olla, like with the main box, glass watering bulbs help with irrigation and soil moisture.

At this writing, I have four transplanted tomato plants, some transplanted marigolds, six cucumbers, and several bush green beans growing. I attempted to grow green peppers, but the weather hasn’t been conducive to those. So I have replaced them with some radishes and black seed Simpson lettuce.

Three of the tomato plants appear to be doing well, the cucumbers are growing slowly but steadily, and the green beans seems to be doing very well. The radishes and lettuce should break the surface in another week. In the containers, all of them have thriving sprouts. I even had to thin them out a bit.

So far, things are doing better than last year. That extra three weeks seems to have helped.